")
Step into a world where magic dances at your fingertips. Fantasy nails are not just about colors and designs; they’re a portal to enchanting realms filled with fairies, mermaids, and moonlight queens. Picture delicate wings fluttering on your tips or shimmering scales that catch the light like ocean waves. This whimsical nail art allows you to express your creativity while embracing your inner mythical being.
With the right materials and techniques, you can transform mundane nails into breathtaking pieces of art. Whether you’re preparing for a costume party or simply want to add some magic to your everyday look, fantasy nails are perfect for any occasion. Let’s embark on this enchanting journey together!
Materials Needed for Fantasy Nails
Creating stunning fantasy nails requires a few essential materials to bring your imaginative designs to life. Start with a basic nail kit, including nail clippers, files, and buffers. These tools will help you shape and prep your canvas.
Next, gather some high-quality base coats and topcoats. A strong foundation is crucial for long-lasting wear and vibrant colors. For the magical touch, choose an array of polishes in shimmery pastels or deep jewel tones that evoke fairy tales.
Don’t forget the fun extras! Nail art brushes allow for intricate detailing on your designs. Gemstones, glitter, and stickers can add mesmerizing elements reminiscent of enchanted realms.
Consider having some nail foils or decals on hand. They offer unique patterns without needing advanced skills. With these materials ready to go, you’ll be well-equipped to create nails fit for any mystical occasion.
Step-by-Step Guide on Creating Fairy Nails
Creating fairy nails is a delightful process that invites magic into your manicure. Start with clean, shaped nails. Apply a base coat to protect them and enhance longevity.
Choose soft pastel colors like lavender or mint green as your foundation. These hues evoke the enchanting essence of fairies. Two coats will provide a vibrant finish.
Next, it’s time for the sparkle! Using a fine glitter polish, delicately apply it to the tips of your nails or create an ombre effect from base to tip for added whimsy.
To add dimension, use nail art pens or brushes to draw tiny stars or floral designs on one or two accent nails. Consider small rhinestones for extra glamour; they mimic dew drops glistening in sunlight.
Seal everything with a top coat. This not only adds shine but also ensures durability against daily wear and tear. Enjoy showcasing your magical fairy-inspired creation!
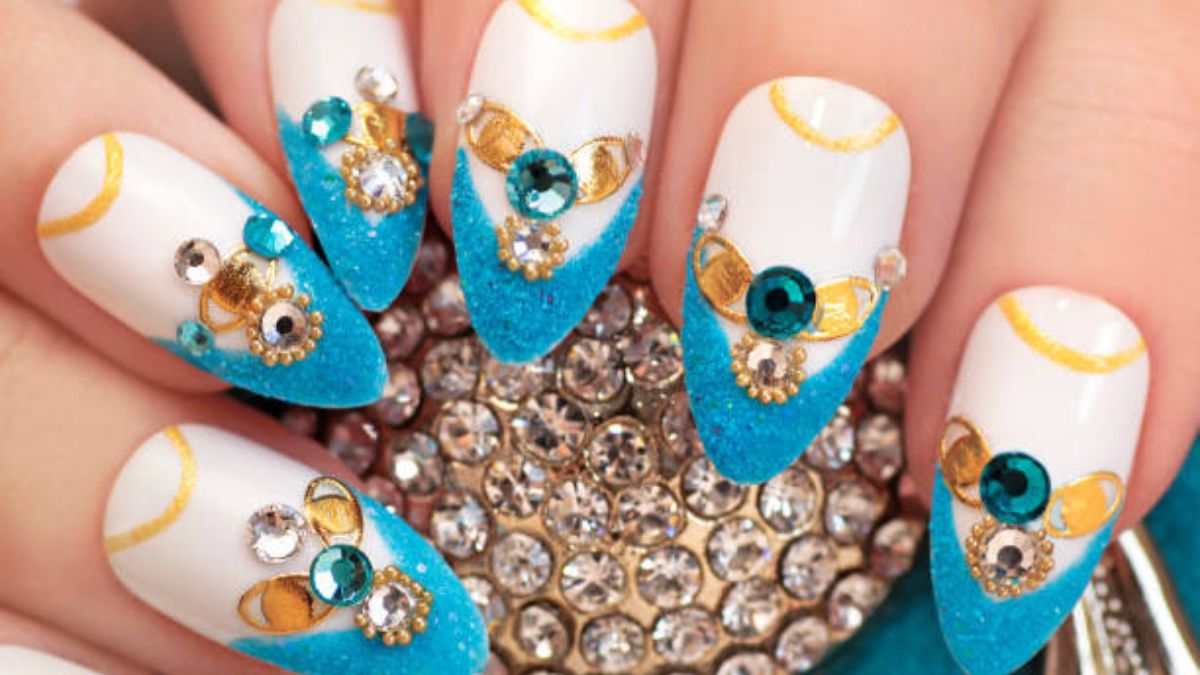
Tips for Perfect Mermaid-Inspired Nails
To achieve perfect mermaid-inspired nails, start by choosing a stunning color palette. Think ocean blues, pearlescent whites, and hints of shimmering greens. These colors evoke the beauty of underwater worlds.
Add texture for an authentic touch. Incorporate nail foils or glitter that mimic fish scales. This creates a captivating visual effect that dazzles in any light.
Experiment with nail art techniques like ombre or marbling to blend your chosen shades seamlessly. A gradient from deep sea blue to bright turquoise can be especially enchanting.
Don’t forget about embellishments! Shell-shaped studs or tiny starfish charms can elevate your design further. Place them strategically on one or two accent nails for added flair.
Finish off with a glossy top coat to seal in the magic and enhance shine. Your mermaid nails will sparkle just like treasures hidden beneath the waves!
Moonlight Queen Nail Design Tutorial
To create your Moonlight Queen nail design, start with a deep navy or midnight blue base. This color sets the perfect backdrop for your celestial theme.
Once dry, use a thin brush to paint delicate silver crescent moons and stars across each nail. You can vary their sizes for an enchanting effect.
Next, add a few tiny gemstones to mimic twinkling stars. Apply them strategically on some nails for added glamour.
For a touch of ethereal glow, finish with a shimmering topcoat that captures light beautifully. This will give your nails an otherworldly sheen reminiscent of moonlit nights.
Let your creativity flow as you mix in glitters or holographic elements if desired! Each detail enhances the magical aura of this elegant design.
Maintenance and Removal of Fantasy Nails
Maintaining your fantasy nails is key to keeping them looking magical. Regular touch-ups can help preserve the intricate designs and vibrant colors. Use a gentle top coat every few days to enhance shine and protect against chips.
Cleaning your nails properly is essential, too. Avoid harsh chemicals that could damage the artwork. Instead, opt for mild soap and water when washing your hands.
When it’s time for removal, take care not to damage your natural nails. Soak cotton balls in acetone or a non-acetone remover and place them on each nail. Wrap with foil to let the solution work its magic.
Gently push off the design after a few minutes of soaking—don’t force it! If any remnants remain, buff lightly rather than scraping aggressively. Treat your nails well post-removal with nourishing oils or creams to restore their health.
Conclusion: Embrace Your Inner Magical Being with Fantasy Nails
Fantasy nails allow you to express your creativity and passion for the whimsical. Whether you’re channeling the ethereal vibes of fairies, the enchanting allure of mermaids, or the mysterious charm of moonlight queens, there’s a design just waiting for you to bring it to life.
With each brushstroke and embellishment, transform your nails into tiny canvases that reflect your unique personality. Don’t be afraid to experiment with colors, textures, and designs. Embrace glittery accents or iridescent hues that catch the light beautifully.
Remember that these magical creations are an extension of who you are. They can boost your confidence and make every day feel like a special occasion. So gather those materials, follow those guides, and let your imagination soar as you delve into the world of fantasy nails. Your fingertips will become portals to enchantment!